|
Ultra Fractal Tutorial -- When and Why to use the Alpha Channel
Ok, so hopefully you're starting to understand how the Alpha Channel works. Now what's the point? I've really thought long and hard about this question while writing this tutorial. With rare exceptions, I think most users experiment with the Alpha Channel after they've begun working on an image -- rather than planning ahead of time to use it in a particular way. At least that is how it has worked so far for me and a few other users I've polled.
Rather than talk you through creating an image that uses the Alpha Channel, I'm going to show you three images that demonstrate different ways and reasons to use transparency. If I may suggest, read through this whole page first, then load the parameter files for all three of these images which can be found here, and then go back through the tutorial again with the images open so that you can play and experiment with them along the way.
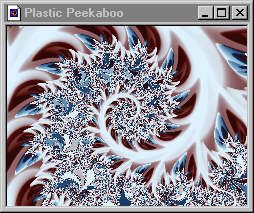
Let's start with a Challenge 1 entry by Damien Jones. "Plastic Peekaboo" has two layers — both layers share the same formula, location and gradient. The only difference between layers is the outside coloring algorithm used for each. The bottom layer is on the left, top layer on the right:
With the Merge Mode set at Normal and 100% opacity, we would only see the top layer, but just by editing the Alpha Channel (making no other changes), Damien made most of the dark red and blue parts of the gradient transparent and created this cool effect (which looks to me like someone dribbled liquid plastic over his fractal):(Just in case this example is too confusing at first, I've altered the bottom layer to have a solid green gradient. Since there was no green in either the top or bottom gradients before, this example will show you exactly what part of the top image is transparent and what is opaque. Everything that is now green is coming from the bottom layer, everything that is not green is the opaque part of the top layer.)
The Alpha Channel comes in handy in instances like Damien's image. When you don't want the colors of your layers to interract in any way you can set the Merge Mode to Normal at 100% opacity and use Alpha Channel transparency to see or hide exactly what you want of the layer below (and of course you can use the Alpha Channel with other Merge Modes, too).
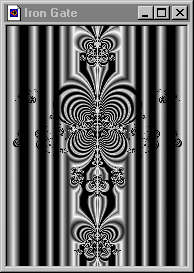
Sometimes you'll want to use the Alpha Channel for detailed sculpting or tweaking. Here are the two layers of the next example, one of my Challenge 5 entries:
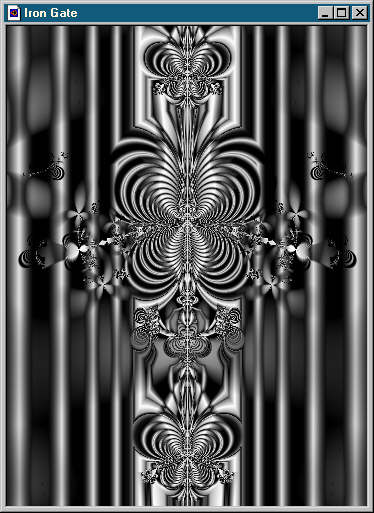
As I worked on this image, I decided to set the Merge Mode to Difference at 100% and then opened the Alpha Channel to sculpt the bars and ironwork. Here's the final version of "Iron Gate":
In order to be able to appreciate the minute control that the Alpha Channel can give you you'll need to load the parameter file for this image. Once loaded, try toggling the top layer's Alpha icon off and on. You'll notice that the changes effected are very subtle, but then to really have fun, open the Alpha Channel editor and try rotating it with the slider and moving the control points around. See the possiblities? I tweaked this image for HOURS before I settled on exactly the look I wanted!Sometimes when I'm creating a fractal I'll see a color I want to get rid of or a shape I want to emphasize and I'll use the Alpha Channel to achieve that goal. But just as frequently I open up the Alpha Channel editor for each layer (of course the bottom layer never has one!), add a control point, and then move it around just to see if there might be a hidden effect awaiting discovery.
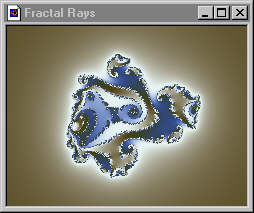
In some cases, you may have a specific idea in mind before you create a fractal and know that you'll need to use the Alpha Channel to achieve that effect. Frederik Slijkerman did just that for this image which also comes from the first Challenge (the goal of which is to explore the Alpha Channel feature). Here are the separate layers:
. . . and here's how they look combined with Multiply Merge Mode set at 100% opacity:
But now look what happens when Frederik edits the Alpha Channel.
Not only does he maintain the golden rays of the top layer merged with the Phoenix Julia image below, they now alternate with rays of just the bottom layer's coloring. Cool, huh!?!These are but three examples of the usefulness of the Alpha Channel. Try loading the parameter files for each of these images into Ultra Fractal and playing with them. Then try creating these kinds of new images on your own with which to experiment:
With each one, open up the Alpha Channel editor for the top layer, add a control point or two and see how the colors interract. Don't forget to try different merge modes, too.The more you practice using the Alpha Channel -- playing with these examples and experimenting on your own -- the more comfortable you'll get!
- Make a two-layer image in which each layer is identical except for the gradient.
- Make a two-layer image using different coloring algorithms for each layer.
- Make a two-layer image in which each layer has a different location and/or formula.
There are also a lot more examples of using the Alpha Channel that can be found in the Challenge #1 Gallery. Parameter files for all those images are also available from that page.
If you have questions, comments or corrections, please send me an email.
Back to UF Tutorials