|
Ultra Fractal Jump Start Tutorial
Ultra Fractal is an incredible fractal program. It combines most of the features of other fractal programs, plus the ability to create and merge layers like Photoshop, Paint Shop Pro and other graphics/paint programs. It can read parameter and color map files from FractInt, another popular fractal program, and images are created in 24-bit (True Color). You can write your own (or choose from a wealth of others') coloring methods and transformations which can be applied to any fractal formula.
I cannot say enough about how well thought-out and designed this program is. But for the beginner, or someone with experience in another fractal program, it can be a little confusing at first. (My personal opinion is that through other programs we've come to expect the user interface to be baffling and limiting and so it's hard to retrain the brain to think logically and sensibly.) I offer this "Jump Start" tutorial, which I originally wrote for a user named Bob, to help you create your first Ultra fractal.
- Open UF :)
- Choose File|New (Ctrl-N)
- Click the + beside "dmj"
- Choose "Phoenix (Mandelbrot)" — a thumbnail of the default formula image will appear in the browser
- Click OK
- If the Properties windows (there should be two) are not open, open them with Fractal/Properties (Ctrl-P)
In the smaller Properties window, you have three tabs: Layers, Image, Comments. For right now just make the image big enough so you can see what's happening (480 x 360 is good)

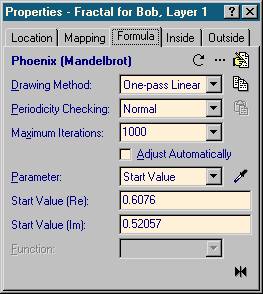
In the larger Properties window you have five tabs: Location, Mapping, Formula, Inside, and Outside. Let's start here. Choose Formula. If you click on the Parameter Drop-down list, you have 5 different parameter categories that you can enter for this formula. Go ahead and enter some values. (I entered 0.6076 and 0.52057 in the Start Value parameters, and 0.8 and 0 in the Phoenix Distortion parameters
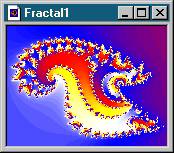
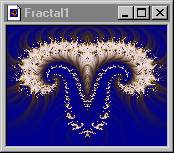
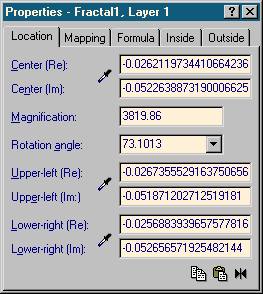
At some point you probably want to zoom in some to see what you've got. You can zoom in two ways. With your mouse, click on the image where you want the center of your zoom to be. As you drag the zoom box bigger, the center stays where you originally clicked. Once you have the zoom box the right size, you can move it by clicking and dragging in the middle of it. You can also rotate it by clicking and dragging the end of the rotator handle. When you've got everything the way you want it, click Zoom In in the "Select" box that has popped up. Alternately, you can do all this with numbers in the "Location" tab. (The bottom image on the right was produced by the location parameters in the screen shot. The parameter file is linked below so you don't have to type all those crazy numbers in!)


For the moment, because there is so much you can do in UF that you couldn't in FractInt, I suggest not zooming in too far. In fact, one way to learn how everything works is to stop zooming and just start applying coloring methods and transformations on the "whole" image.
Would you like to change the coloring of your fractal? I've posted some hints on doing that here. For now, go to File/Browse/Gradient and choose the "Royal" one in the Examples file. Click OK. Once it is open, press Ctrl-C to copy it to the clipboard. Close that gradient. Now choose Fractal/Gradient (Ctrl-G) to open up the current gradient for the open image. Press Ctrl-V to paste in the Royal gradient.
Since we have the gradient editor open, you can use the little slider to rotate the colors. You can also click and drag any of the little boxes around to change colors. If you'll look to the left or right of each panel, you'll see which potential colors you'll get if you drag that highlighted control (white square with dotted lines running through it). You can also use Ctrl-H to switch to HSL mode (and Ctrl-R to switch back to RGB). Sometimes it is fun to try the Randomize options in the Gradient menu. If you hate what you've done, you can always use the Undo/Redo buttons!
OK. Let's go back to the Properties window with the five tabs. Click on Outside. This is where you determine the coloring for the outside points. Basically, you can stay here for a month of Sundays exploring and playing with all the options. I'll talk you through one and then you're on your own. Click on the "..." It brings up the Outside Coloring browser. Choose Triangle Inequality Average from the dmj folder. Click OK. Now your image has probably changed significantly, but there are several ways you can continue to tweak it here. I try changing the transfer function first, then I just click on each option until I find a look I like.
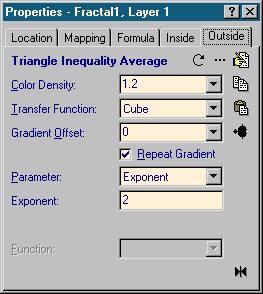
Changing the Color Density also can really change your image. Besides the options given in the drop down list, you can enter any number from a very small one to one in the hundreds. Basically, increasing the density usually adds the number of colors seen and complexity of design in the image. Decreasing the density simplifies and lessens the number of colors.
If your image has "inside" areas, you can change their coloring in the same manner in the Inside tab.
Now, for one more "effect" . . . click on the Mapping tab. Click on the + button and choose the "Symmetry" transform in the dmj folder. You have several symmetry modes to choose from. You can always toggle the transformation on and off by clicking on the little icon next to the word "Symmetry" and if you decide you don't want that transform at all, you can remove it by clicking on the "-" button.

I decided to play with the gradient even further to bring more colors into the image.
You can click on this image to see it full-size (640x480).
You can save your image in four ways.
- Save the parameters (File|Save Parameters), and give your image a name. You can view it again at any time by choosing File|Browse|Parameters (Ctrl-B).
- Save the image (File|Save or Ctrl-S) as a .UFR file. The image can be saved before it has finished rendering. When opened again in Ultra Fractal, it will continue rendering to completion.
- Export the image (File|Export Image) as a .BMP, .JPG, .PNG, .PSD, or .TGA file at its current size.
- Render the image to disk (Fractal|Render to Disk) as a .BMP, .JPG, .PNG, .PSD, or .TGA file. Using this feature, you also have the option to specify any size and to anti-alias the image which usually makes for a smoother finished product.
The parameter file for the "Fractal for Bob" image I've made here can be found here. Be sure to save it with a .upr extension (like jumpstart.upr). If you like the color gradient, you can save it too (open the image, then open the Gradient Editor — then just choose File|Save and give it a name.
Hopefully, this tutorial has given you enough information that you can now experiment with different formulas, coloring methods, transformations and gradients on your own. I plan to write another tutorial soon that will give some hints on using layers. If you have questions, comments or corrections, please send me an email.
Back to UF Tutorials