|
Ultra Fractal Tutorial -- Using Opacity/Transparency With Solid Colors
The capability to control the opacity and transparency of a layer is unique (among fractal software) to Ultra Fractal. Unless you have some experience with this concept in a paint or graphics program, you may find it confusing at first. This tutorial is the first of three that will deal with different ways of setting and using transparency in your fractal images.
When you have an image that contains more than one layer you need to know some things about the opacity/transparency of all but the bottom-most layer. (Since the bottom layer does not merge with an underlying layer, no transparency is possible.) In my Layers Tutorial, I introduced Merge Modes and how they affect a multi-layer image. But there are other ways of controlling the way images interract.
I'm going to talk you through creating a sample image with which you can play and explore these concepts. Open up a new fractal (Ctrl-N or File|New|Fractal), choosing the "Built-In fast Julia" formula found in the Standard folder. In the Julia seed parameter fields on the Formula tab, enter .025 in the "Julia seed (Re):" field and 0 in the "Julia seed (Im):" field. This will give you a black circle on a blue background (unless you've changed your default gradient). First, I want to put a design of some sort in the circle so choose the Inside tab, click the ... button and choose the "Orbit Traps" coloring formula in the "dmj" folder. Now set the following parameter options:
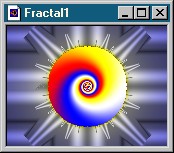
Go to the "Outside" tab, and change the "Transfer Function" to None which changes the blue background to black. Name this Layer "Inside Spiral". Your image should look like this:
- Trap Shape = Spiral
- Trap Coloring = angle to trap
- Trap Mode = trap only
Ok, that takes care of the inside, now let's do something with the outside. First, add a new layer. Now go to the "Inside Tab" and change the "Transfer Function" to None. Now click the little black Mandelbrot button which will allow you to change the solid color and its opacity. I'm going to want you to set the "Opacity" to 0 (which will make the Inside of this layer completely transparent), but before we do that take a few moments to play around with the Solid Color settings. Enter any numbers you wish (from 0-255) in any of the fields and watch how the image changes. You can change the Opacity setting too (greater than 0 and less than 255), to allow partial transparency. When you're done playing, enter 0 in all the fields, including "Opacity". To verify that the spiral you're seeing in your image is from the bottom (Inside Spiral) layer, toggle its visibility off. When only the top layer is visible, you should have a completely black layer. Also note that the little Alpha icon is highlighted on the top layer -- this indicates that transparency has been activated.
Leaving the bottom layer's visibility toggled off, let's add some coloring to the Outside of the top layer. On the "Outside" tab, click the ... button and again choose the "Orbit Traps" formula from the "dmj" folder. This time select "Trap Shape" = Cross and leave all the other parameters at their default settings. Name this layer "Outside Cross" and change its "Merge Mode" to Luminance at 88% Opacity. Again, you can verify what is happening in each layer by toggling each layer's visibility on and off.
This might be enough, so far, to show you that you can set each layer's Inside and Outside coloring but it isn't a very exciting image yet, so let's add another couple of layers that will help us control coloring and texture. Make sure you have your top layer highlighted and then add a new layer (which should now appear as "New Layer 1" on the top of your list.
Again, go to your "Inside" tab and click the black Mandelbrot button. Set the "Opacity" to 0. This makes our Inside area transparent and allows us to see through to underneath layers. On the "Outside" tab, click the ... button and replace the "Orbit Traps" coloring formula with the "Smoothed Iterations (Mandelbrot)" formula from the "dmj" folder. Change the "Merge Mode" to Multiply at 100% and name the layer "Outside Smoothing." The shading provided by the Smoothed Iterations formula helps soften and tone the outside cross shape.
It would be nice to add something to the Inside spiral shape -- perhaps a texture of some sort. Add one more layer and change the "Transfer Function" on the "Outside" tab to None. Click the black Mandelbrot icon and set to "Opacity" of the solid Outside color to 0 so that all underneath layers will be seen. Now switch to the "Inside" tab and select a new coloring formula with the ... button. Choose the "Lyapunov" formula in the "dmj" folder and then select real part of z as the "Variable to Track". This is going to give an interesting texture, but we need to tweak the gradients a bit. Open the gradient editor (Ctrl-G or Fractal|Gradient). Click Edit|Paste Special and select the "Grayscale" gradient in the Standard folder. Change the "Merge Mode" for this layer to Difference at 100% Opacity and name it "Inside Bifurcation". Try rotating the gradient to bring out the texture. At this point I went back to the bottom layer and started working with its gradient. I used the Misty Randomizer (Ctrl-3) to try different color combinations. Here is my final image:
You can get the parameter file for this image here (save as ot.upr). There are so many places to play with this image -- for each layer you can adjust:
The possibilities are endless and the more you play, the more you'll learn!
- Inside and Outside coloring formulas and parameters
- Solid color RGB, HSL and Opacity parameters
- Merge Modes and Opacity
- Gradient
After you've fully digested the information in this tutorial, you can learn other ways to control and use transparency in the next part of this tutorial.
If you have questions, comments or corrections, please send me an email.
Back to UF Tutorials