|
Ultra Fractal Tutorial
Using Opacity/Transparency with Gradients —
How the Alpha Channel Editor Works
This is part two of a three part tutorial about Opacity and Transparency in Ultra Fractal and is a continuation of the concepts presented in part one, available here.
Now that you understand how transparency works with solid colors in the Inside and Outside tabs, it is time to talk about using it with the gradient editor. With the solid color, you've only got one color to work with so you only have one opacity/transparency setting. With the gradient editor, you have millions of colors and 400 control points with which you can set opacity and transparency. Wow! This means you've got all kinds of control you probably didn't know you had! First, let's talk about how it works, and then we'll talk about why you'd want to use it.
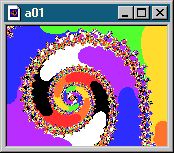
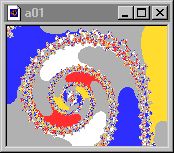
I have created an image that looks like this. You can get the parameters for this image here.
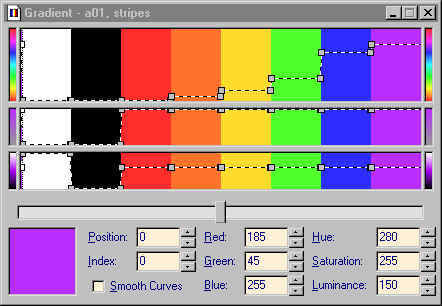
The top layer is a spiral with eight chunky colored sections (white, black, and six colors). Because the gradient is divided into 400 control points, I have made each color band with a width of 50.
The bottom layer is the same spiral, but the gradient is a solid gray.With the Merge Mode set to Normal 100% we don't see the bottom layer at all, but we're about to change that by altering the transparency of the top layer, not with the slider on the layer tab, but with the Alpha Channel editor.
With the fractal window active (title bar highlighted), click the alpha button
on the toolbar. By default, the Alpha Channel editor opens with one control point (at the far left) set at the very top. Since the entire gradient area is white, this means that the entire color gradient has complete opacity. If you click and hold that one control point, dragging it downward, you will see that as it nears the bottom, and the Alpha gradient becomes blacker, the two layers blend until you only see the bottom layer. This has exactly the same effect as moving the Merge Mode Opacity slider toward 0%.
Move the one control point on the Alpha Channel editor back to the top. While holding down the Control key, click anywhere in the white area to add another control point. This time when you drag either of the control points around, you'll see that part of your image is gray (showing the bottom layer), part of the image shows the fully vibrant colors of the top layer, and the rest is a merging of the two layers. The positioning of the Alpha Channel editor's control points corresponds to the colors on the Color Gradient editor. If you'll position one of the two editors directly above the other in your workspace, you will notice that wherever your Alpha gradient is white, the corresponding color on the Color Gradient is the clearest in your image. And wherever the Alpha gradient is black, the corresponding color is missing (now gray) from your image.
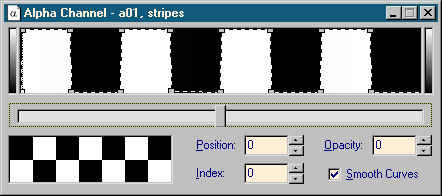
To show this even more clearly and dramatically, I created an Alpha Channel of stripes which match the index points on the Color Gradient. Highlight and copy (Ctrl-C) the purple text below.
stripesAlphaChannel {
alpha:
title="stripes Alpha channel" smooth=yes numnodes=16 index=0 alpha=0 index=1 alpha=255 index=49 alpha=252 index=50 alpha=0 index=99 alpha=0 index=100 alpha=255 index=149 alpha=255 index=150 alpha=4 index=199 alpha=0 index=200 alpha=255 index=249 alpha=255 index=250 alpha=0 index=299 alpha=0 index=300 alpha=252 index=349 alpha=255 index=350 alpha=0
}
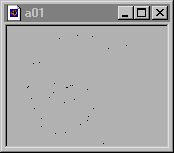
With your Alpha Channel editor open in UF and its title bar highlighted, paste (Ctrl-V) the text into it. Your Alpha Channel editor should now look like this:
and your image like this:Because the black stripes on the Alpha Channel editor, indicating full transparency, exactly correspond with the black, orange, green and purple stripes on the Gradient Editor, you see the gray from the bottom layer instead of those colors in your image. Only the colors corresponding with the fully opaque (white) stripes are visible. Choose Alpha|Invert to reverse the stripes. Now the white, red, yellow and blue parts of the spiral have become gray. Also try rotating the Alpha Channel editor's slider. Moving it even one point to the left (Position -1) allows a little of the other colors to show.
Using the Alpha Channel editor allows you to have as many as 400 additional points with which to control the opacity and transparency of each layer. Note that there is never an Alpha icon for the bottom layer of your fractal. This is because even though it may appear that you can edit the Alpha Channel for your bottom layer (nothing in the software prevents you from doing so) it has no effect because there isn't a layer underneath with which the bottom layer could merge. Alpha gradients can also be saved and re-used in the same way regular Color gradients can (File|Save or Ctrl-S) but since new ones are so easily created and uniquely tied to the needs of a particular image, you may find that there is no need to save them.
There is another good example of how the Alpha Channel works that can be found with the UF Parameter Browser in the fs-exam folder. Please take time to play with both that image and my example above before progressing to the next part of this tutorial.
Hopefully, these examples have shown you how the Alpha Channel works, but the images aren't very pretty -- so when you're reasonably comfortable with the information presented so far you may want to go on to the next part which discusses when and why you'd really want to use this capability -- continued here.
If you have questions, comments or corrections, please send me an email.
Back to UF Tutorials